Test Specimens
Discs of 8-10 mm diameter are supplied of approximate 0.7mm thickness. Specimens are then prepared on site (in our metallographic preparation suite) by grinding with a specially designed holder to the final required dimensions of 500 +/- 5 microns. Grinding is undertaken with progressively finer grit papers until the final finish is achieved (1200 grit fine paper).
Small Punch Creep Test Equipment
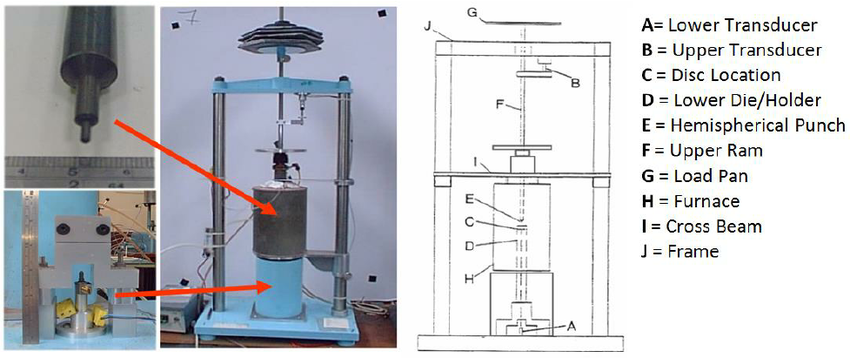
A suite of specially designed and manufactured test rigs are available at SMaRT to conduct small punch disc creep testing (example shown below). The miniature disc specimen is mounted in a lower die holder, which locates the sample in the centre of the rig and applies a circumferential clamping load to hold the disc securely in place during loading.

The load is then applied to the disc via a 2mm diameter hemispherical ended punch. A vertical ram connects the punch to the weight pan, where calibrated weights are stacked, applying the required load to the specimen.
Heat is applied by a single zone furnace, digitally controlled and monitored throughout the test by two thermocouples which are located in a hole drilled in the upper die, close to the surface of the disc.
Two linear variable displacement transducers (LVDT) are employed to monitor the rate of displacement that the specimen undergoes during a test. The top transducer is located just below the load pan and monitors the displacement of the indenter penetrating into the top surface of the disc. The bottom transducer is located within the lower pull rod and the measurement is taken directly off the surface of the disc via a quartz rod which is in contact with the underside of the specimen. This facilitates monitoring of the average deflection experienced as the specimen starts to deform under the applied load.
All small punch creep tests are performed in an inert argon environment to limit any potential oxidation effects.
SMaRT routinely conducts small punch disc creep tests in compliance with the following international and industry standard:
- European Code of Practice for Small Punch Creep Testing: Part A 2006 – CEN workshop agreement CWA15627

